10 Tips to Start a Successful Travel Blog

A travel blog might be right for you if you love to travel and want to share your adventures with the world. However, how does one begin a travel blog? What makes it distinctive? We’ve compiled a list of the fundamental factors and the preliminary setup procedures you ought to follow to begin your trip blogging journey.
Here’s my guide to start a successful travel blog!
- Establish Your Audience
- Select a Name
- Set Up Domain + Hosting
- Setting up on WordPress
- Connecting to Google Analytics
- Branding + WordPress Themes
- Logo + Design
- Essential Plugins for Travel Blogs
- Set Up Your Main Pages
- Create a Content
step one
ESTABLISH YOUR AUDIENCE
You must ascertain whether there is a market for your travel blog before you can launch it. The main concern you might have is “Who will read my travel blog?”
Some people start blogging for leisure, and over time, it turns into a business. But you need to make a plan before you start if you’re going to start a travel blog from scratch with the intention of making money from it.
1. Select a topic for your writing. broader than “travel and food.” Look farther. A plan goes into creating well-rounded material. For me, it’s a healthy mix of travel advice, content centred on specific locations, photography, and retail therapy. My affinity for F.R.I.E.N.D.S, designing, and marketing are also little hints of my personality.
2. Determine your audience’s needs before shaping your material accordingly. Whom are you trying to reach? For me, it’s a woman or man in their 20s to 30s who has a love of cuisine, travel, and unusual experiences. I must always keep my target audience in mind to provide content that they would enjoy.
3. Then, do some research to see if anyone else has written about the same subject (niche, subject, etc.). If so, consider how you could approach it otherwise or more effectively. There are many travel blogs online, so you must set yourself apart.
step two
SELECT A NAME
Try to come up with names that will grow with you. The title of your trip blog, such as “A Week in Kerala,” might not be pertinent after a month. Keep in mind that you’ll probably continue with your name throughout the existence of your blog because it’s a part of your brand. Aim for something memorable and non-limiting.
Trust your instinct when selecting one once you’ve reduced your options.
Simple Advice for Choosing a Memorable Name:
Once you have a list of potential names, see if the domain is available (that is, if the URL for your website is still available) and if it’s available on social media.
step three
SET UP DOMAIN + HOSTING
Understand the differences between hosting and your domain!
If this is your first website, you’ll probably need to learn a few terminology that are unfamiliar to you. You should be aware of the distinction between a domain and hosting. Even though they are occasionally advertised as a pair, they are substantially distinct.
1. Make it Simple to Remember: It’s suicide for your brand to have a long name that requires repeated spelling and that readers might mispronounce. At all costs, avoid!
2. Make it Special: Numerous travel blogs already make use of well-known travel terminologies like “Wanderlust,” “Adventurous,” and “Wandering.” Consider unconventional ideas! If you get stuck, ask your buddies for assistance!
3. Consider the Future: Do you always wish to offer advice on inexpensive travel? or journeys across Europe? Things might have taken a turn for the worst if I had chosen to dye my hair a different colour. If you think your content might evolve as you gain more travel experience, resist the need to confine yourself to a particular specialty.
4. Synergy: Do not use different names for your social media accounts and website. If the name you want doesn’t already exist on one platform, think about changing everything to fit. You want to be simple to find!
- The address of your website is a domain. For instance, biteofparadise.com is my domain name. You must pay an annual domain registration charge in order to claim your website.
- In terms of web hosting, we’re referring to leasing space on the internet for your website. Naturally, you’ll require both.
I’ll now walk you through the procedure! Visit GoDaddy, Sign up and select “Get It Now.”
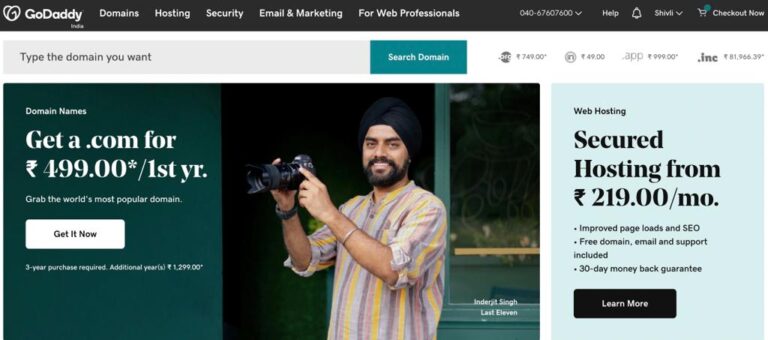
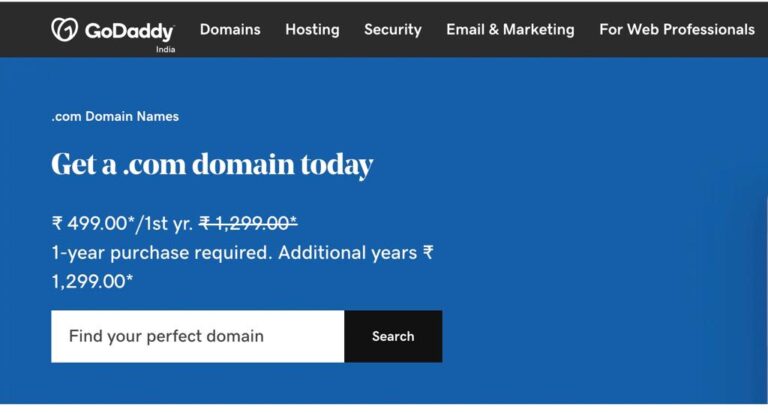
Find your perfect domain name
Select web hosting under hosting tab and choose a plan
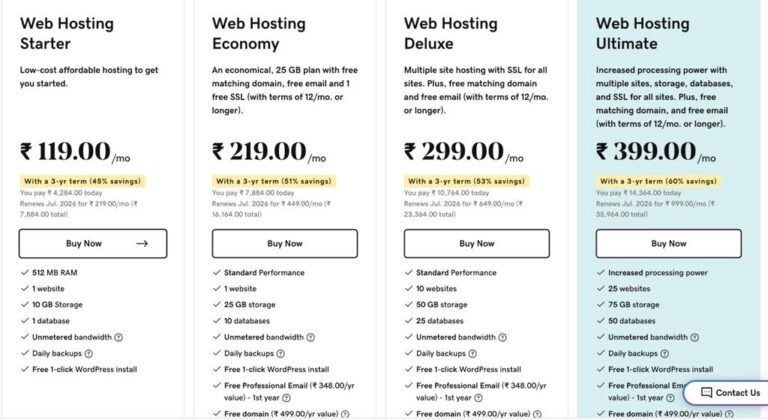
Starting with the Economy Plan is what I advise. You shouldn’t worry; one of the best things about blogging is that setting up your website won’t cost you a fortune. When you initially start a blog, this is the most expensive part, but it’s rather affordable.
step four
SETTING UP ON WORDPRESS
It’s time to start your blog now that your domain and hosting are set up.
WordPress is a great platform for new users and offers a wide variety of plugins and themes so that it can expand along with you and your audience. Although there is a slight learning curve, it’s simple to locate assistance and advice online, and this platform allows you to do SO much. They are quick and simple to set up, but you have to pay a charge and have very little design freedom. WordPress has innumerable customizable themes and plugins and is always free! When they inevitably went to WordPress, many of the bloggers I know who started on one of these other platforms had to meticulously convert their websites. It’s not simple. And hiring a professional to do it for you is not inexpensive. Therefore, I advise starting with WordPress from scratch.
Now, let’s set up WordPress!
Once you’ve signed up for hosting on GoDaddy, you’ll be asked to set up your wordpress account. You will get a wp-admin url from where you can start working on your blog. Then, you’ll be prompted to choose a theme and log in.
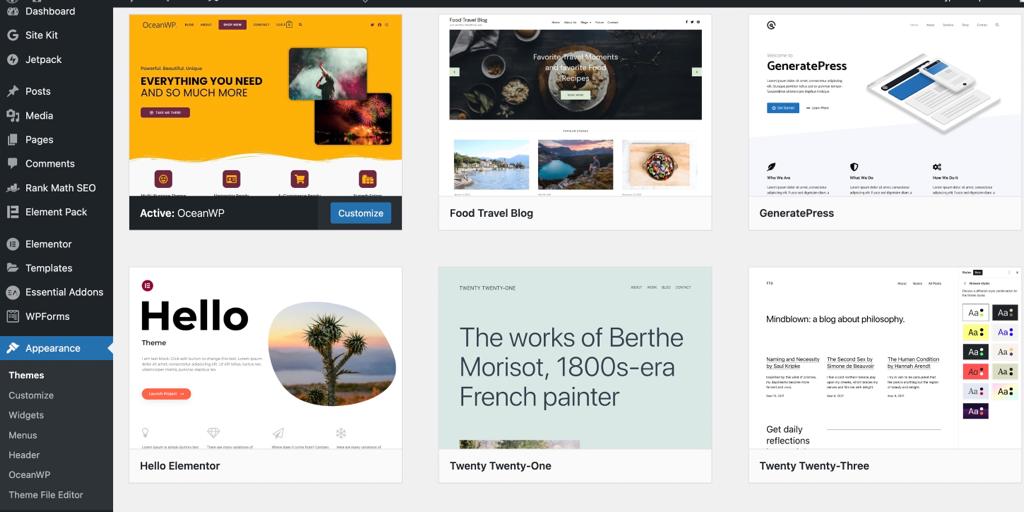
This is how WordPress looks like.
Your dashboard’s left-hand column will display the following information:
Posts: You’ll write and upload your blog entries
Pages: You’ll develop static pages like an About Me or Contact page for your website.
Comments: You can approve, spam, or respond to comments on your blog entries here.
Appearance: Blog can be changed by installing a new theme, including graphics and font changes, adding graphics, updating your sidebars, etc.
Plugins: This is where you install and update plugins (extra features) for your blog. Settings: This is where you change the settings for your site, such as the tagline.
step five
CONNECT TO GOOGLE ANALYTICS
Google Analytics provides you with a detailed analysis of your traffic as well as other readership data. You’ll be able to view a wealth of information about your traffic, such as the number of visitors to your site, their average session length, country of origin, age range, etc.
Step-by-step instructions are provided on the Google Analytics website to help you get started. Monstrous Insights Installing Google Analytics on your website is likewise a simple process.
step six
BRANDIND + THEMES
Choosing your website’s theme is, in my opinion, the most interesting step! Page layouts, colours, formatting, and even fonts are all included in a WordPress theme. Remind yourself that some themes utilise “shortcode” and that changing themes after you’ve developed a lot of content can cause your site to malfunction. While you CAN change your theme again in the future, doing so might necessitate updating the code on your entire website.
So, when selecting your initial theme, think about your long-term branding!
- The colours on your website are simply one aspect of branding. Think on all the components that make up your brand, from the website’s colours and typefaces to the way you communicate.
- What defines your brand’s ethos? Do you “tell it like it is” or are you “the girl next door”? What emotions do you want your readers to have when they consider your blog? Focus on words like affable, discerning, knowledgeable, humorous, contentious, etc.
- It’s helpful to start out with a broad concept. From there, it’s critical to remain sincere, commit to the idea, and maintain consistency.
WordPress themes are widely available online, in both markets and from individual graphic artists.
- There are many lovely themes from designers on Creative Market, and you may check reviews before making a purchase.
- One of the biggest, best WordPress theme marketplaces I’ve seen is ThemeForest.
- Another great source for original and innovative themes is Elegant Themes.
step seven
LOGO + DESIGN
When you’re just starting out, having a built-in “logo” that displays your blog name in the header may be fine with some WordPress themes. There are a few options available if you want to create a unique logo or images for your site.
To start, you can learn the fundamentals of Adobe Photoshop and make a logo and other visuals utilising the colours and typefaces associated with your brand. However, taking this way could take a while. I suggest Canva to complete beginners because it’s a fantastic tool for creating brand pieces and graphics. They are very simple to customise and include thousands of layouts, stock pictures, and preset designs for just about everything.
If you have some money set aside for design, another choice is to hire a freelance graphic designer to create your logo and/or images. On Upwork and Fiverr, you may locate fantastic freelancers and only pay for the jobs you need! Always check that the freelancer has positive feedback and a portfolio with designs that fit your requirements.
It’s heaven for improving your aesthetic because Creative Market provides so many preset logo templates, fonts, patterns, and textures that you may use in your website and branding elements.
step eight
ESSENTIAL PLUGINS
WordPress provides simple-to-use plugins, such as Rank Math SEO, that will assist you in optimising your website and blog posts for Google Search, as well as other plugins, such as Askimet, that handle spam comments. Additionally, as no one WordPress theme can do everything, you might need to use plugins to customise your website with elements like picture sliders, social sharing icons, etc.
Here are some of my preferred WordPress plugins:
Rank Math SEO: Math Rank The most popular SEO plugin for WordPress, SEO, makes it incredibly simple to raise the rankings of your blog posts and web pages in Google. If you’re just starting to learn about incorporating SEO into your blog, they also have a tonne of information.
Google Analytics: This programme, which is the industry standard for analytics, gives you a tonne of useful data about your articles, pages, and audience.
Akismet Anti Spam: Every minute spam comments are posted on websites. You don’t even see them because Akismet automatically detects and removes them.
BackWPup: Always make a backup of your website!
Grammarly: Although Grammarly isn’t a plugin, I STRONGLY suggest installing the Chrome Extension on your PC. Grammarly can prevent you from making many embarrassing typos; this plugin will automatically indicate the errors and provide suggestions; it can proofread your emails, social media posts, WordPress blog draughts, etc. You can use the proofreader by uploading documents to the website. It is very beneficial!
step nine
SET UP YOUR MAIN PAGES
You should set up both your primary pages and the blog posts once you’ve uploaded your theme and plugins. Go to the left sidebar of your WordPress Dashboard and select Pages > Add New to create a new page (or post). (Or Posts > Add New for a blog post.)
A page is a static piece of material that exists independently of the blog, as opposed to a post. In your blog feed and in the search results is a post. Your “pages” are essentially benchmark “higher level” pieces of information that serve as the foundation for the website. The content you share are your blog postings.
- About Me Page: The majority of users will go on your About page right away. Make it simple for readers to learn more about you, and be clear about what they can expect to find on your website.
- Message Page: Make a page so people can contact you! To prevent receiving spam emails, be sure to make it clear what kinds of emails you will or won’t react to.
You could discover that as your site expands, you need to add more pages to showcase your best blog entries. My About, Start Here, and Destinations pages receive the most traffic.
step ten
CREATE A CONTENT
Establish a reliable routine that works for you and follow it. In terms of consistency, that could entail posting once a week or once a day, depending on your objectives and how long it takes you to produce valuable content.
You do need to post as frequently as possible to gain momentum. Consider it this way: You want to offer visitors a reason to return, and you want there to be fresh content waiting for them when they do. They probably won’t return if not.
Before you venture farther, develop three to five pieces of content for each of those categories. In this manner, visitors to your website who are interested in any of those topics will have much to read.
Everyone enjoys seeing things, and Pinterest and social media are no exception! Getting your food and travel content on social media is important for expanding your audience and attracting organic readers (who will return to your website repeatedly).
In the end, beginning a travel blog is the simple part. The much harder, all-nighter job is in promoting it, providing material, and maintaining your audience’s interest over an extended period of time. You will succeed in making a career out of a travel blog the most with perseverance, hard effort, good fortune, and devotion. Continue your effort, but don’t forget to have fun while you’re there. At the very least, your blog will serve as a record of the amazing events and memories you’ll be able to save for the rest of your life.